PiPPi | 2 years ago | 3 comments | 5 likes | 798 views
Decentralized, Dani, michiel and 2 others like this!
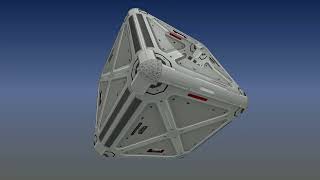
Finally, after uncountable hours. A fair large step for me in 3D modeling, I finally got the hang of UV unwrapping and texture mapping.
It's of course still very basic but I actually know exactly how it works now. This is on a model I created for testing. The model has no submodels. The texturing is "normal mapping", getting two different textures on one single model is done through texture mapping from an unwrapped UV map of the model.
Yes I know, there is a small mistake in the mapping here but so be it for now.
Mediafiles here: c.mail.com...
There's no way I can explain this without writing a small novel and in the process making a complete fool of myself in front of the people here who work with this.
But check out the media files under "Textures". Two images make up the texturing. The "ShieldForUVmapping_Diffuse.png" is what is the colourmap in BT. I created the "ShieldForUVmapping_Normal.png" from the colourmap as a normal map and it is what creates the 3D texturing effect.
Those two maps are in turn based on a UV map that I created from the shields model. Looking at any of those images you can of course see how the 3D model has been unwrapped as a 2D image. Load the show in BT and the images in Photoshop and edit the images, you'll see the results on the model by clicking the Refresh button in BT.
You can use the "ColourmapNormalmapReflectionmap.cfx" effect for this. However, in this show I used the "ColourmapNormalmapCubemap.cfx" so if you add the file "cubemap.dds" from your installation in the field Texture 3 you get an interesting multitexturing effect.
I'll leave it at that but suffice it to say that this opened up uncountable possibilities for my work with BluffTitler moving forward.
Regards
PiPPi


Nice result!
When showing off a normal map I would place the point light closer to the surface, use a higher value for the FX LIGHTING FACTOR prop and a smaller value for the FX NORMAL STRENGTH prop. Keeping the model fixed and only animating the position of the point light probably has a more dramatic effect because that's impossible to do with a colour map.

michiel, 2 years ago
Thanks Michiel,
Yes, I really need to work a whole lot more with lighting in BT. I hardly ever touch the defaults in any given show and it's obviously key to making it look good.
Regards
PiPPi
PiPPi, 2 years ago
Understanding what happens when you move a light closer to a surface is valuable knowledge, valid in all 3D apps and for eternity!
Compared to that, knowing that in BluffTitler you have to use the POSITION prop of the light layer is too banal for words :)

michiel, 2 years ago


