

 michiel | 2 years ago | 14 comments | 14 likes | 988 views
Dani, Decentralized, LostBoyz and 11 others like this!
The metalness map tells the renderer which parts of the model are metallic. In this example the bow and arrow and the rucksack straps.
ORM map
To save precious video memory, the occlusion, roughness and metalness maps are stored in the same texture. This is the ORM map:
outerspace-software.com...
Effect
The AdvancedMaterials\ColourmapNormalmapCubemap effect uses the metallic map to set the visibility of the cube map. This effect is automatically selected when your model features an ORM map.
When you choose MEDIA > CHANGE EFFECT... you can see how this effect uses its textures:
1st texture slot: colour map
2nd texture slot: normal map
3rd texture slot: cube map
4th texture slot: ORM map
All textures are automatically loaded from the 3D model, except the cube map:
outerspace-software.com...
Cube map
The BluffTitler installer comes with an example:
BluffTitler\Media\Textures\Cubemap.dds
Here's more about cube maps:
outerspace-software.com...
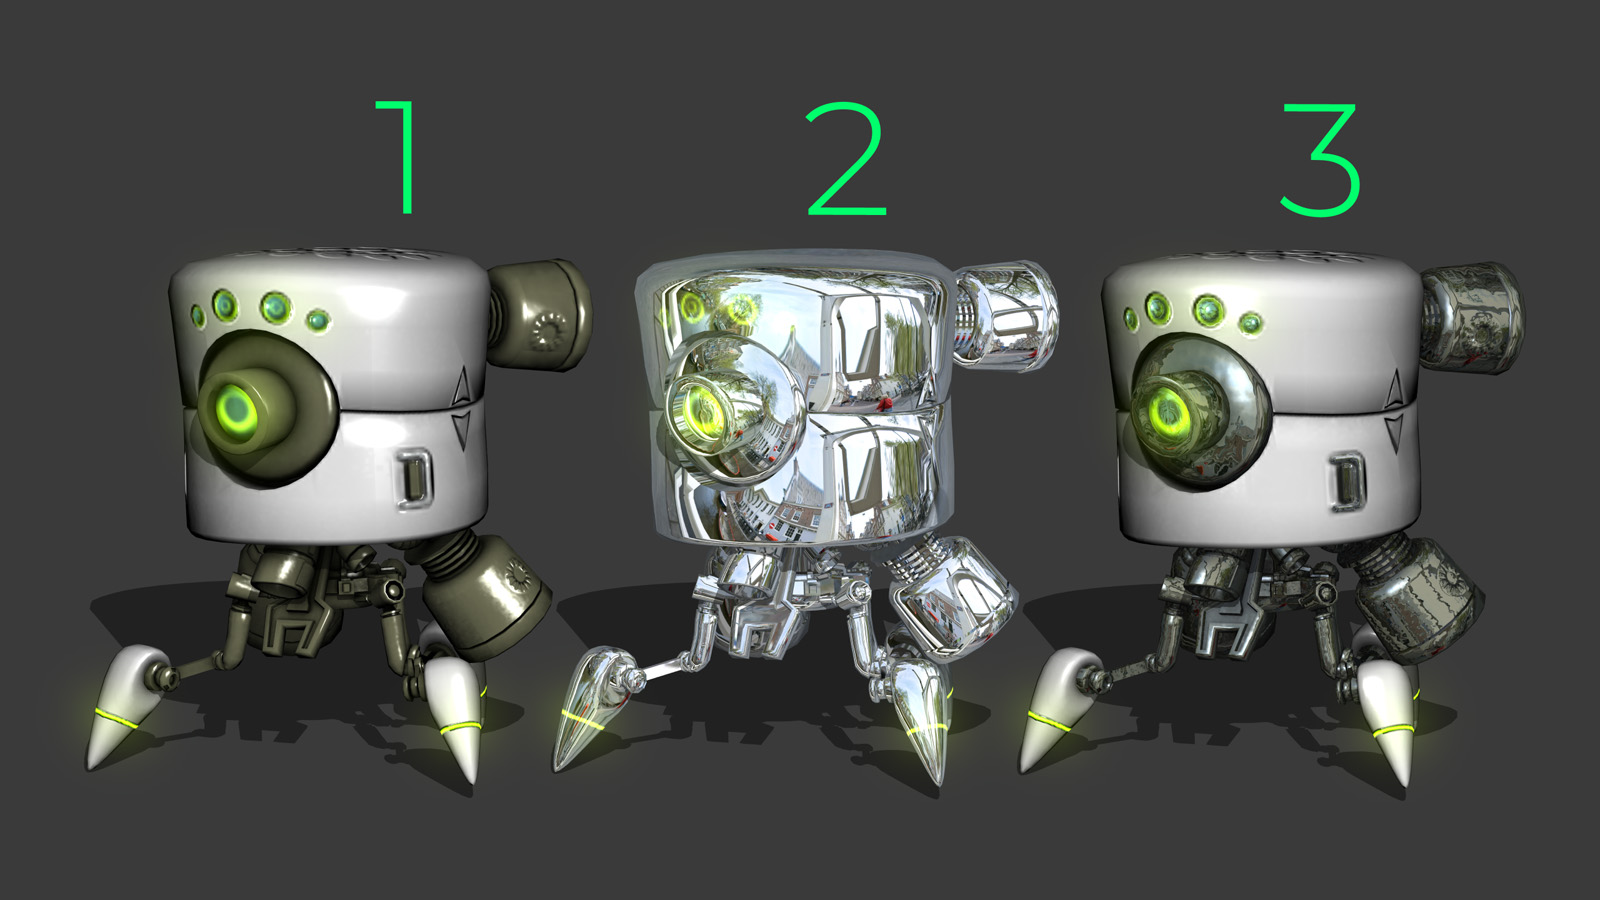
Render 1
The 1st render does not use a cube map. This way nothing looks metallic.
Render 2
The 2nd render uses Cubemap.dds in its 3rd texture slot. But the FX IGNORE METALLIC MAP is set to 1. This ignores the metallic map so everything looks metallic.
I've cleared the normal map to make it super smooth.
Render 3
The 3rd render keeps the FX IGNORE METALLIC MAP prop to its default value of 0. This makes only the metallic parts look metallic. Clearly this looks best!
The FX REFLECTION FACTOR prop is set to 2 to boost the effect.
Other props
The FX NORMAL STRENGTH prop is set to 2 to boost the normal maps.
The SPECULARITY prop is set to 0.9 to add specular reflections.
Model
The model used in the screenshot can be downloaded here:
sketchfab.com...


Realize that the same can be achieved by splitting your model into its submodels: a separate layer for every submodel. This way you can set the FX REFLECTION FACTOR prop differently for every submodel. A metallic map automates this: it achieves the same with only a single layer!
michiel, 2 years ago


THNX Michiel it's getting better and beter.
Filip, 2 years ago


GRACIAS MICHIEL
EDWIN, 2 years ago

Here's another spectacular example.
I've set the FX REFLECTION FACTOR in the 3rd render to 1.3. This way the metallic parts take over the mustard green a bit.
michiel, 2 years ago
Comment to this article
More by michiel


About michiel
Michiel den Outer is the founder and lead coder of Outerspace Software. He lives in Rotterdam, the Netherlands.
If he isn't busy improving BluffTitler, he is playing the piano or rides the Dutch dikes on his bikes.
819 articles 4.1M views
Contact michiel by using the comment form on this page or at info@outerspace-software.com