Xenofex2 | 3 years ago | 11 comments | 615 views
No doubt a question asked many times before but cannot see any answers or a tutorial. A relative new User of Bluff Titler although I do use Photoshop Elements & Magix Video Editing programs, I am trying to add my own png image near to the end of one of the videos in Bix Pack 42, in a small area of the sky. (Also at probably less than 100% opacity, or even get it to fade in/out.) I have added (I think) the image as a new Layer (layer 8 it says), but then I cannot actually see the Image, adjust sizing and move into postion, let alone trying to only get it to appear between two key points, and adjust opacity etc. Suggestions certainly welcome please.


It is difficult to say! Which template did you use?
Maybe the camera has an special position in this template?
Every new layer has a base position (0,0,500). So maybe it's out of reach for the camera?
Filip, 3 years ago
Using 27 Mars and then wanted to add a (perhaps opacity reduced) png image of our grandson in the sky area towards the end of the video. Obviously I am not understanding the program fully as when adding a layer in say Elements, it appears as the next layer and one adjusts accordingly. You mention a possibility of the 'camera maybe has a special position', or, 'maybe out of reach of the camera'. Sorry, a totally new area of understanding for me, if this is a possibility, any idea as to where should I be looking to understand more on this aspect?
Xenofex2, 3 years ago
In this screenshot I've added 2 picture layers.
On the left, a 2D picture on top of everything, that is not part of the 3D scene. This is done by using the 2D IN FOREGROUND style (2nd dropdown below the textbox).
On the right, a 3D picture, standing on the Mars surface, that is part of the 3D scene. This done by using the 3D IN 3D SPACE style. This is the default style in the same dropdown.
Here's a trick to quickly position a picture layer in front of the camera:
1) Select the picture layer
2) Place the layer at the exact same position as the camera: press <Ctrl> I
3) Move it a bit away from the camera: right click in the render window and move your mouse, with the right button still pressed, a bit upwards
Move it horizontally and vertically by moving your mouse in the render window with the left button pressed.
And scale it with the SIZE prop.

michiel, 3 years ago
Many thanks for that screenshot. That has certainly helped. After many many attempts I have got there. OK could be better, but am really pleased with my first attempt.
It has though highlighted another question about the appearance of the png image. One moment it is not there, the next it is. A somewhat abrupt appearance. Is there any way one can fade in the Intro?
Xenofex2, 3 years ago
Maybe this video helps: outerspace-software.com...
The one about the keyframes.
Set the Picture layer as the active layer. Set two keyframe on the timeline. The second keyframe is set on the moment you want the picture to appear. Go to the first Keyframe and choose in the Picture layer properties "Transparency" and set the value to 1. The Picture disappears and is slowly appearing when the second timeline is reached.
Filip, 3 years ago
Thankyou again. Had actually watched that Keyframe Video Tutorial a number of times as well, but something in your comments made us look again and slowly slowly I think it is all coming together.
Xenofex2, 3 years ago
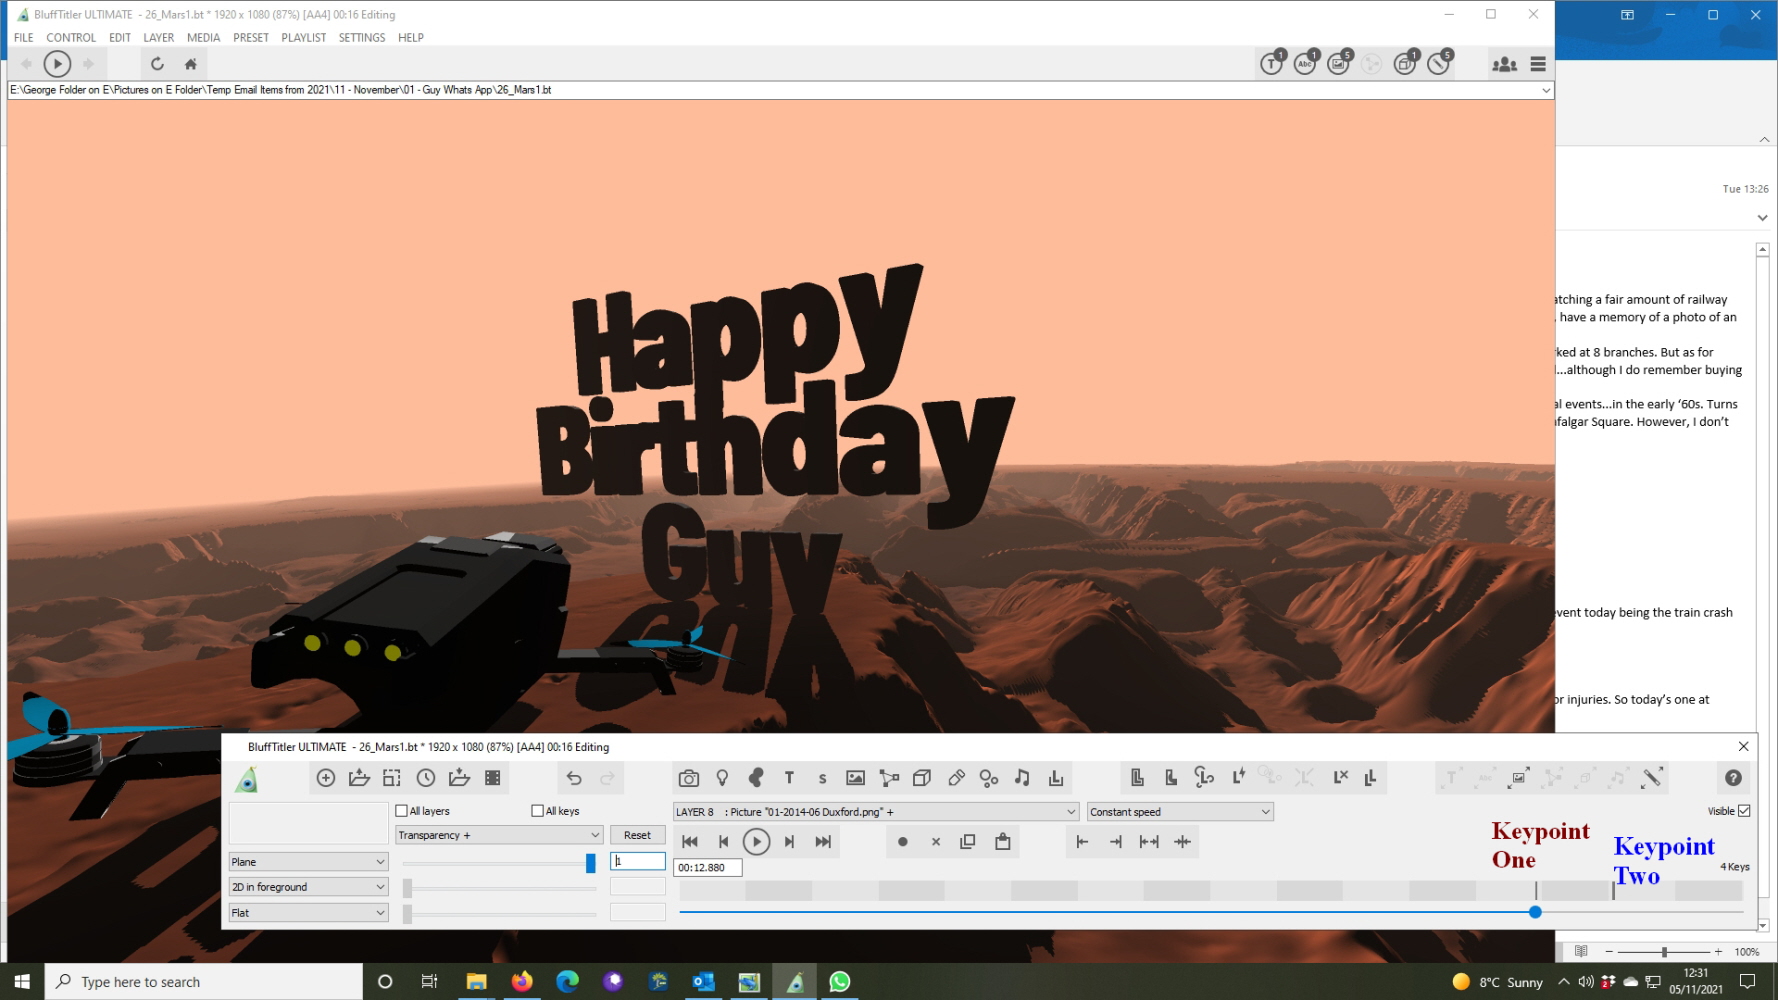
Sorry I am still struggling and still would like some help in getting my added image to slowly appear, rather than abrupt, despite the following advice
"Set the Picture layer as the active layer. Set two keyframe on the timeline. The second keyframe is set on the moment you want the picture to appear. Go to the first Keyframe and choose in the Picture layer properties "Transparency" and set the value to 1. The Picture disappears and is slowly appearing when the second timeline is reached."
I attach a screenshot. Whilst I think I have followed the above instructions, I am still obviously missing something, Between the two Keyframes (at Keyframe One the Transparency Setting is ‘1’, and at Two, it is ‘0’.) but there is no gradual appearance of the photo between the two keyframes. At Keyframe Two the picture still abruptly appears.
Any advice would be greatly appreciated.
Xenofex2, 3 years ago
Your screenshot says that your layer has 4 keys. Your 2nd key is very thick, maybe you have placed 3 keys very near to each other. Deleting 2 of them will solve the issue.
michiel, 3 years ago
Not 100% sure as to how, but I have now achieved my aim. I did though wonder as to how you knew that there were 4 keyframes in my screenshot. Looked again closely at the image and I could then see the wording, 4 keys, so something else learnt.
It's been a good week this week, thankyou all.
Xenofex2, 3 years ago

